If you rewound the clock a decade or so, you may have been able to get away with not bothering to draw your eyebrows in your daily makeup routine.
Unfortunately, eyebrows have made a huge comeback in the past few years. If you are in a rush, feel free to skip eyeliner, mascara, and eyeshadow, but never leave the house without drawing your brows.
Drawing eyebrows, however, can be pretty daunting for beginners. You want something full enough to give your face more character, but you don’t want to look like a cartoon character either
Here’s where we step in (gently), and show you how to draw the perfect eyebrows easily.
1. Decide on the shape you’d like
It’s difficult to know how to draw your eyebrows if you don’t have an idea of how you want the end result to look like. Think about whether you would like your brows:straight, arched, or curved.
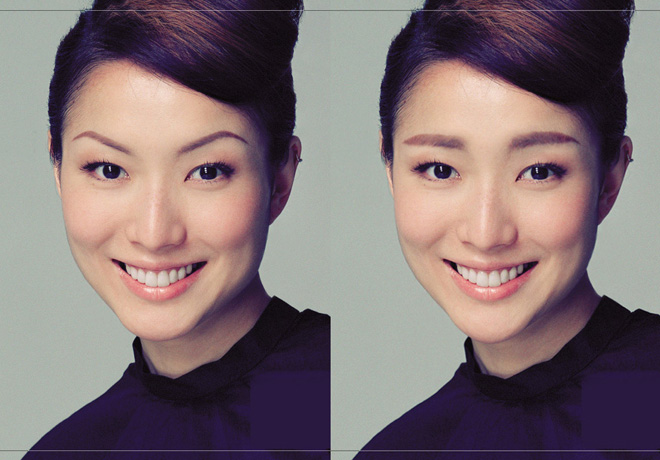
Your eyebrow shape can really play a huge role in the kind of image you portray to the world. Take a look at the comparison pictures below.

Source: Eyelifts

Source: Soompi
You can tell that Sammi Cheng and Song Hye Kyo give off entirely different vibes in the side-by-side pictures, even though only the shape of their brows have been tweaked.
Arched brows

Arched brows are a cornerstone of the classic, femme fatale look. High arches have fallen out of favour with Asian women since the 1990’s, but lower and gentler arches are still in-trend.
They’re great for heart-shaped and round faces, as it provides angularity and definition.
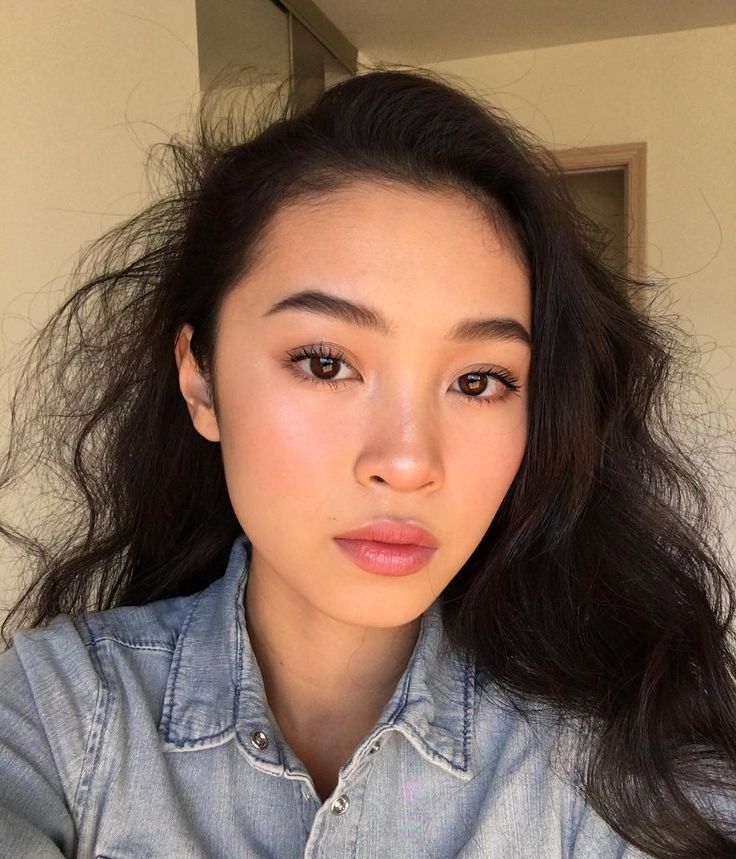
Curved brows

The curve is the much gentler version of an arch, and gives your face a more youthful, girl-next-door look.
Those with square faces may find that the curved brow shape will be ultra flattering on them, as it provides some balance and softens up the angles.
This brow shape is currently very popular with Asian women – most people can easily pull this off effortlessly as it closely follows the natural brow shape.
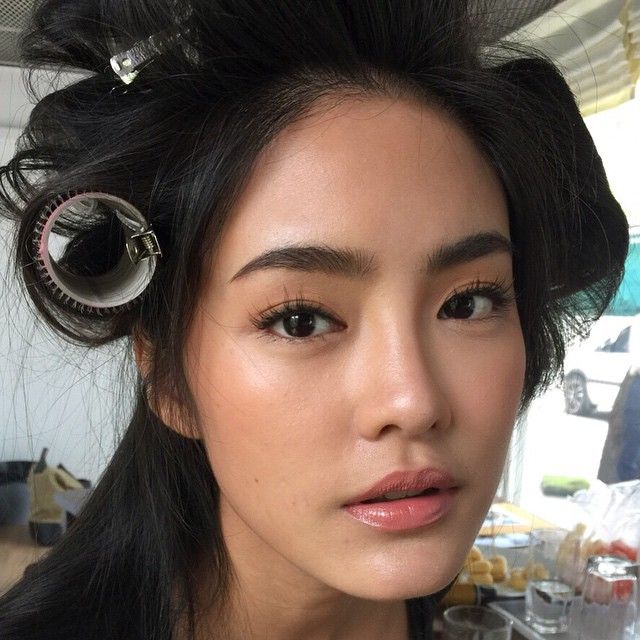
Straight Korean brows

Straight brows popularised by Korean celebrities have become one of the hottest brow trends in recent years. However, this trend isn’t suitable for everyone, and would be better worn by those with longer or oval-shaped faces.
Straight brows have also started to fall out of favour among Asian women, even among Koreans who made this brow trend popular. Famous Korean actress Bae Suzy, for example, has replaced her straight brows with naturally curved ones:

2. Groom your brows

Source: Equally Wed
Thicker and more luxuriant brows may be in, but that doesn’t mean you should leave your brows growing willy-nilly.
It is way more difficult to see your brow shape and learn how to draw your eyebrows if you have hair growing all over the place. Don’t say we didn’t warn you!
If you’re not sure how to do it yourself, Daily Vanity strongly recommends that you get your brows shaped by a trained brow professional. Tweezing, threading, or waxing – it’s up to you!
3. Buy your brow product in the correct shade
Most Asians have black hair, but that doesn’t mean that you should automatically go for black eyebrow shades.
Often, black shades can appear too harsh when you use it to fill your entire eyebrow. Even if you have properly mastered how to draw your eyebrows, jet black shades itself may look too intense for our skin colour.
Instead, go for something that’s a shade lighter than your natural black hair, such as charcoal, ash-gray, dark gray, or even dark brown. Of course, pick something that’s still generally black-based so it still matches your hair.
If you have coloured hair, then you may have to start experimenting with your eyebrow colours. Blonde hair, for example, may even require you to bleach your eyebrows so that your eyebrows look more consistent with the hair on your head.
The general rule of thumb is to get a shade that somewhat matches at least the shade intensity of your hair, if not the actual colour.
4. Create a “guide” for yourself
Freehanding your eyebrow can be pretty tricky and intimidating for beginners, so we do not recommend beginners try that, especially if you are rushing for time in the morning before work. Rather, in order to properly learn how to draw your eyebrows, start off with a rough shape guide.
Take note that this guide is only relevant to those who are intending to create an arched or curved eyebrow shape. If you’re going for a straight brow, this guide will not be applicable.
How to draw an eyebrow guide (for arched and curved shapes):

Using a ruler or any long, straight edge, use your nose to measure where the head of your brow should begin, where the arch should be, and where the tail of your brow should end.
- With the ruler aligned vertically straight along the corner of your nose, mark out a straight line – this will be where the head of your brow should start.
- Using the same ruler, align it with the corner of your nose and through the center of your eye – this will mark the highest point of your eyebrow shape, or where the high point of your arch should be.
- Lastly, measure from the corner of your nose and along the outer edge of your bottom eyelid. This marks where the tail of your eyebrow should be.
- Make sure that the tail of your brow does not end higher than where the head of your brows begin, as this might make your eyes look droopy and lower.
You can draw a guide with straight-edged outlines along the shape of your brow, but take note this will make your brows look harsher, and should only be attempted if this is the look you prefer.
Otherwise, you can simply use dots at the more prominent points as a much rougher guide, leaving the edges of your brow to be more natural looking.
5. Start from the center

Most beginners, when learning how to draw their eyebrows for the first time, will usually start shading from the inner corner of their brows and move outwards from there.
This is actually not a good way of drawing your eyebrows, as it will instead give you a fiercer look and make your brows look more stilted.
If you are using an eyebrow palette with several different shades of brown, use the darkest colours at the centre of your brow, as that is generally where you will find the most hairs.
From the center moving towards the two outer edges of the brows, the shade should be getting lighter and lighter. The inner and outer edges of our brow is usually where your hairs naturally get thinner, so drawing your brows should attempt to replicate that.
If you are using an eyebrow pencil and don’t have a few shades to choose between, then practise lightening the shade by going with a softer touch. If needed, use a clean brush or spoolie to help with your blending
6. Use flicking strokes

Source: Maskcara
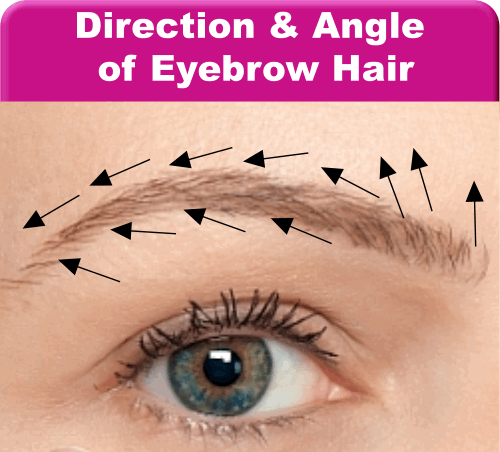
Instead of colouring in your brows, use short, flicking strokes with the brow product to replicate the natural look of individual hair strands in your brows.
Some brow guides even recommend that you use “featherlike strokes”, so you might need to have a bit of patience during this stage of learning how to draw your eyebrows.
Build the colour up slowly, rather than trying to get your desired darkness in as short a time as possible. Trust us, the result will be much more natural-looking.
Before you start filling in your brows, we also recommend that you brush your eyebrow hair downwards first with a spoolie so that you will have a clearer idea of where the bald spots and sparser areas are. Concentrate on those areas when you’re filling in your brows.
7. Blend, blend, blend

Source: Pinterest
We cannot emphasise blending enough for any principle of makeup application, not just those learning how to draw their eyebrows.
You want to avoid having any harsh demarcating lines in your brow colour, so make sure that your blending game is strong – which will help with the rest of your makeup anyway.
8. Practice makes perfect

Source: WikiHow
Finally, remember that drawing your brows is one of the most challenging makeup technique to pick up, and you may not get it right the first few times as a beginner. But the good news is that practice definitely makes perfect, so you should get better as you continue to do it – don’t give up!
Here’s a tip: draw your brows when you’re not in a hurry so you can dedicate more time to it. And if you’re really serious about perfecting the skill of drawing your brows, consider setting aside 30 minutes a day to do it, even if you’re not going anywhere. You’ll be able to master it and be familiar with creating a look that suits you in no time!


